1. Click on the Subscribers tab
Then click the Add/Import button when you want to upload subscribers to your account.

2. Select Upload a File
Then find your file by clicking Browse and make a selection from the Separator drop-down. CSV files will always have “Comma” as the value. Click Continue.

3. Associate the information in your file to our data fields.
In the example above, the value on the left, “Email Address”, came from the file being imported. On the right side you would choose “E-mail address” to associate the “Email Address” values in the file to the “E-mail address” fields in our database.

4. The Advanced Options section contains two areas.
The first, Merge matched records? is asking what to do if any e-mail address are both on your subscriber list in mailRelate and the list you are uploading.
Choosing “No” will stop the upload if any duplicates are found. Choosing “Yes” will cause the duplicate entries to be overwritten with the values of the list you are uploading. Select this feature if you wish to update/replace demographic information for your subscribers during the bulk upload. This will however NOT change an email’s opt-status. An unsubscribed e-mail address will stay unsubscribed until you import the address again and then tick the box for Reactivate existing records.
The second section, Keep first row? is asking if the first column in your file is a subscriber or if it contains the names of each column. The first line in most files contains column names.
![]()
![]()
5. Mark the box in front of Don’t Update Columns with Blank Input.
This will prevent information already uploaded from being overwritten with blank values from your file. Once you do this click Continue.
Tick the box for Reactivate existing records to change a subscriber with opt-status pending, inactive or unsubscribed to opt-status active.

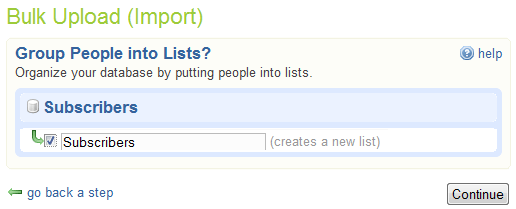
6. Select which list/lists you want to import the subscribers to.
You can import one subscriber to multiple lists at the same time. You can also creat a new list here. Once you have made your selections click Continue.

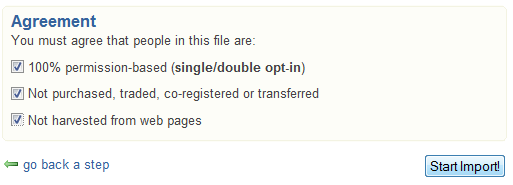
7. Confirm that you have selected the correct list and agree to our legal agreements.
Then click Start Import.
If the import process goes through you will get a confirmation showing that the import was complete.
